Posts Tagged ‘arduino 1.0’
Energy Monitoring using Pachube, Arduino 1.0 and SCT-013-030
Energy monitoring using Arduino through it’s serial monitor completely well explained by openenergymonitor.org. We need some modifications on it to increase the monitoring capability with real time and historical graphical interface like pachube.
There are stuffs we’re gonna use in this project:
Microcontroller:
1x Arduino + EthernetShield. (i used Uno + Wiznet EtherShield)
Voltage sensing electronics:
1x 230V/9V AC-AC Power Adapter
1x 100kOhm resistor for step down voltage divider.
1x 10kOhm resistor for step down voltage divider.
2x 10kOhm resistors for biasing voltage divider
1x 10uF capacitor (for noise filtering purpose)
Current sensing electronics
1x CT sensor SCT-013-030 (Max 30A)
2x 10kOhm resistors
1x 10uF capacitor
—
—
Since we use SCT-013-030 for the CT sensor, we don’t need to use burden resistor because it’s include on the device with 62 Ohms resistance and 1800 turn ratio.
—
In this project, we want to display Irms and Vrms pachube style graphical. Therefore, we need to get Irms and Vrms from arduino calculation with data source coming from Analog ports where sensors connected.
We modify the EmonLib at EmonLib.cpp by adding :
double EnergyMonitor::calcVrms(int NUMBER_OF_SAMPLES)
{
  int SUPPLYVOLTAGE = readVcc();
    for (int n = 0; n < NUMBER_OF_SAMPLES; n++)
  {
    lastSampleV = sampleV;
    sampleV = analogRead(inPinV);
    lastFilteredV = filteredV;
    filteredV = 0.996*(lastFilteredV+sampleV-lastSampleV);      // Root-mean-square method current
    // 1) square voltage values
    sqV = filteredV * filteredV;
    // 2) sum
    sumV += sqV;
  }
  double V_RATIO = VCAL *((SUPPLYVOLTAGE/1000.0) / 1023.0);
  Vrms = V_RATIO * sqrt(sumV / NUMBER_OF_SAMPLES);
  //Reset accumulators
  sumV = 0;
//--
   return Vrms;
}
double calcVrms(int NUMBER_OF_SAMPLES);
#include "EmonLib.h" //
Include Emon Library EnergyMonitor emon1;             // Create an instance
void setup()
 {
 Serial.begin(9600);
 emon1.voltage(2, 234.26, 1.7);  // Voltage: input pin, calibration, phase_shift
 emon1.current(1, 29); // Current: input pin, calibration. Cur Const= Ratio/BurdenR. 1800/62 = 29.
 }
void loop() {
double Irms = emon1.calcIrms(1480); // Calculate Irms only
double Vrms = emon1.calcVrms(1480); // Calculate Vrms only
Serial.print(Irms); // Irms
Serial.print(","); //
Serial.println(Vrms); // Vrms
}
Pachube and Arduino IDE 1.0
Doing some HTTP PUT and GET to pachube.com using embedded system like Arduino is really nice. Latest software version when i post this is arduino IDE 1.0. There are additions to this IDE like DHCP, DNS, and another interesting features. For people who usually use previous version of arduino IDE, there are things you need know before use this IDE 1.0.
In order to use arduino work together with pachube, this complete tutorial is sufficient. I made some modifications on the sketches so it’s suitable for IDE 1.0. Just put the extract files to your sketch directory to make it installed.
Before you apply the arduino to work together with pachube, you need to create account, api_key with full access (read-write), feed and datastreams. This documentation will lead you to catch there.
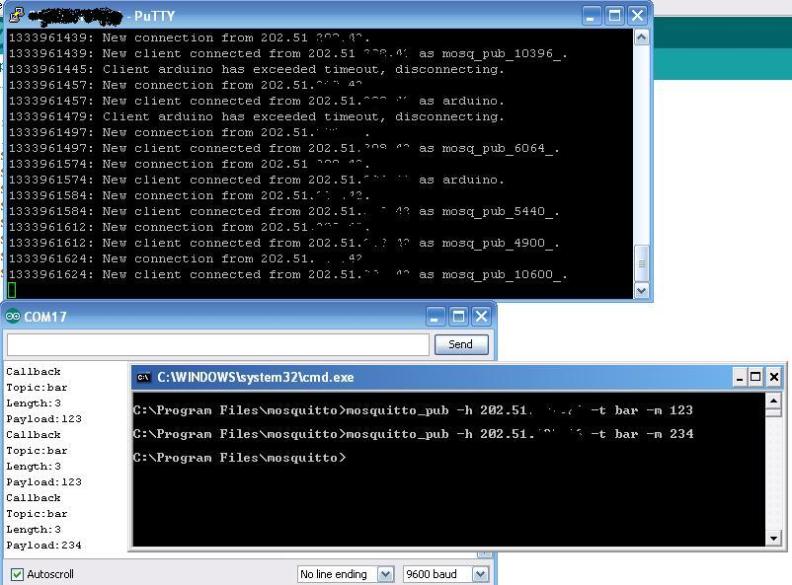
mqtt, mosquitto, arduino 1.0, pubsubclient !
1. install mosquitto on linux (mine, lenny) :
– download from mosquitto. i choose tarball for my lenny.
– tar zxvf mosquitto-0.15.tar.gz ; make ; make install
– executed :
lenny:~# mosquitto
1333960851: Warning: Mosquitto should not be run as root/administrator.
1333960851: mosquitto version 0.15 (build date 2012-04-07 16:53:42+0700) starting
1333960851: Opening ipv6 listen socket on port 1883.
1333960851: Opening ipv4 listen socket on port 1883.
2. download mosquitto for windows, for testing mosquitto_pub purposes.
– install it
– try publish topic :
C:\Program Files\mosquitto>mosquitto_pub -h YOUR_MOSQUITTO_IP_ADDRESS -t bar -m 123
3. Arduino 1.0 IDE for this sketch :
#include <SPI.h>
 #include <Ethernet.h>
 #include <PubSubClient.h>
byte mac[] = { 0xDE, 0xAD, 0xBE, 0xEF, 0xFE, 0xED };
 byte server[] = { 202, 51, xxx, xx }; // IP server mosquitto
void callback(char* topic, byte* payload, unsigned int length) {
 // handle message arrived
 Serial.println("Callback");
 Serial.print("Topic:");
 Serial.println(topic);
 Serial.print("Length:");
 Serial.println(length);
 Serial.print("Payload:");
 Serial.write(payload,length);
 Serial.println();
 }
PubSubClient client(server, 1883, callback);
void setup()
 {
 Serial.begin(9600);
 Ethernet.begin(mac);
 if (client.connect("arduino")) {
 client.publish("foo","hello world");
 client.subscribe("bar");// subscribe di topic "bar"
 }
 }
void loop()
 {
 client.loop();
 }
—
– upload it, check your serial monitor.


